![]()
![]()
T3CP Instruction Manual
Version
2.2 (6.692)
Date
2020-01-14
Content
Creation
of a new Link ("Tables")
Create
a new Query Link („Queries“)
Scope
T3CP is a simple tool that
allows data to be extracted quickly and automatically from an SAP ERP system.
Data on SAP tables and SAP queries can be extracted and stored directly in a
local database table. The user is supported by the interactive user guidance
when creating the extraction operations.
The extraction run can be
simulated and tested interactively before it is scheduled as a Windows task in
the system and then to be executed periodically in the background.
Alternatively, the user can create a link on his desktop to start the
extraction manually – just with one click.
“Job chain” processing can
also be scheduled as a scheduled Windows task. Job chains consist of multiple
steps of extractions from tables and/or queries.
Installation

The latest T3CP version
can be found at Download t3cp.
You can update T3CP in the menu under Settings / Update.
Installation
requirements:
- up-to-date SAP-GUI
(SAP AG),
- “SAP-DotNet-Connector“, see https://support.sap.com/en/product/connectors/msnet.html . Required for SAP GUI version 750 ff.
- access to an SAP
system (as R/3, ECC, S4HANA or other SAP systems that support at least the RFC
protocol and the FB RFC_READ_TABLE).
- Microsoft Windows
operating system (T3CP is tested on Windows from version 7, older versions
should still work)
For old Windows
operating systems (before Windows 8):_
- Current version of
Microsoft Data Access Components, MDAC. MDAC can currently be found at
http://www.microsoft.com/downloads Suchbegriff „MDAC“.
Installation per t3cp starter
On the t3cp download
page, click "t3cp starter", load the t3cp starter and run it.
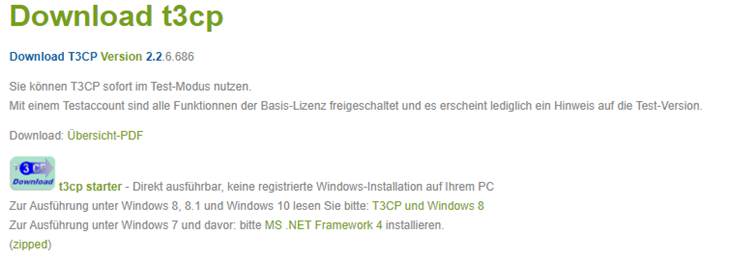
Note the hint for T3CP and Windows 8 & 10 .
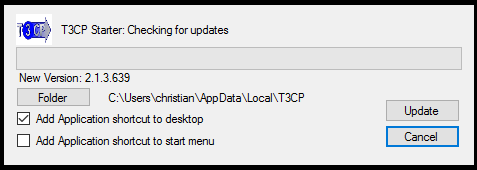
The first run will show
"Installation" instead of "Update." By clicking on Update
or Installation, the program is copied to the computer. No installation
permissions are required.
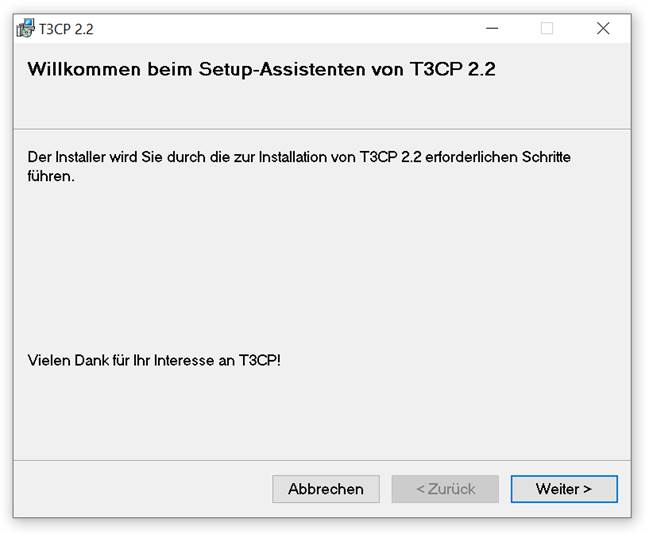
Installation per MSI-Setup
Start the downloaded
Setup.exe. the following window will now appear on your screen:
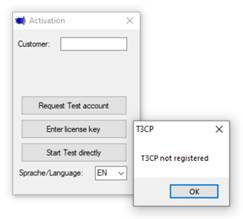
First call of T3CP
Once the installation is complete, T3CP starts
automatically in case of t3cpstarter. In registered test mode T3CP functions
can be unlocked for a period. Request a "test account" for this.
Please purchase a license to use T3CP productively without any limitation.
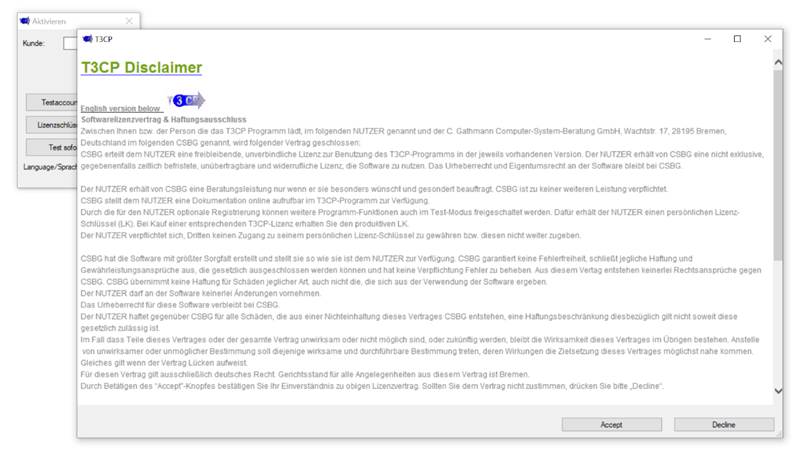
As long T3CP is not licensed or at least registered a
message pops up “T3CP is not registered”.
Once this message has been confirmed, a disclaimer is to be accepted once.
If you do not accept the conditions, T3CP will be terminated.
These steps are omitted
after registration, even in test mode.
With "Start Test
Immediately" you can run the program without registration, but some
functions are then limited. Registration is therefore worthwhile for Test runs
– and it is free.
Activation
Order the License:
http://www.csbg.de/index.php?option=com_content&view=article&id=29&catid=2
You will receive a String
required to activate T3CP. E.g.:
ACTIVATE§E9C7532235A6E47DA928FE640614B35E;TESTMAN;My Company - License for 2 single users
Under „Options“ / „Registration“ you will find „Activation“:
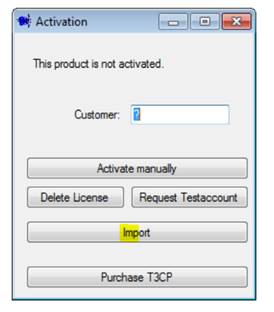
Alternatively you can already do the activation when starting T3CP
by clicking on “Enter license key”.
Click on „Import“ and enter the string you received:
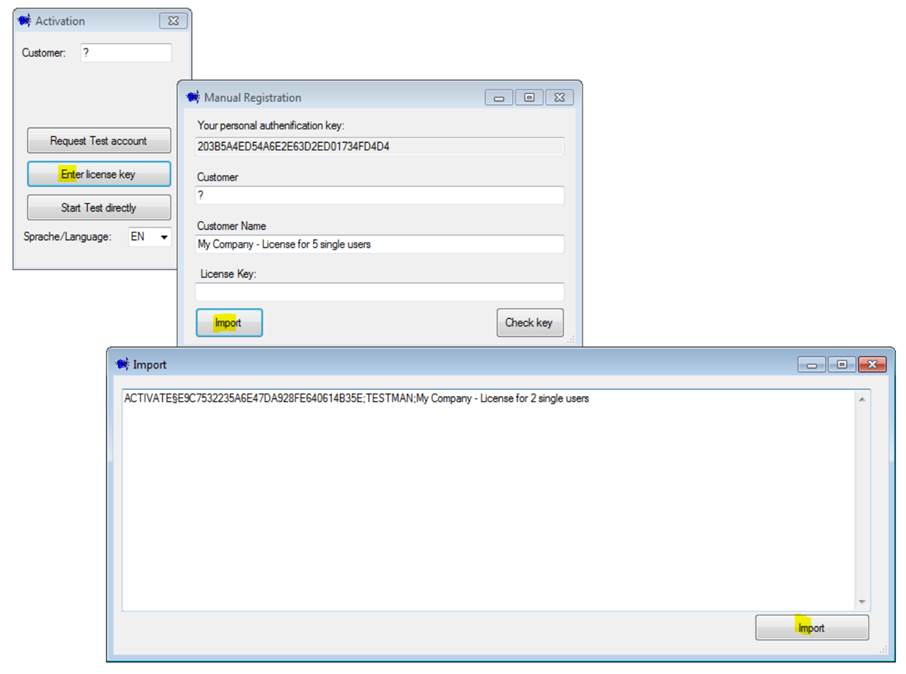
Confirm the entry by
clicking on „Import“.
I case the activation was
successful a new window will pop up and display the license key and the new validity
date:
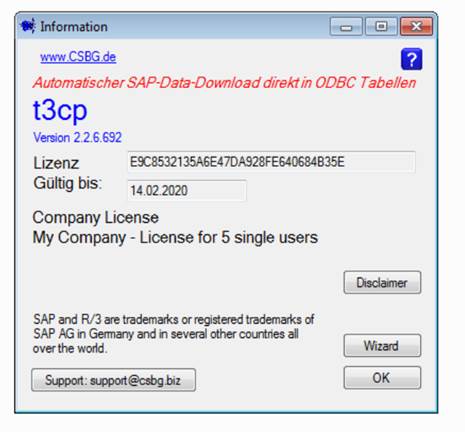
You can now use T3CP
with all features activated.
Call
Depending
on the system and installation, T3CP can be called in multiple ways:
- via the Start menu -> All programs -> CSBG -> T3CP can be opened (if
installed via MSI)
or
- via All
Apps -> CSBG -> T3CP (if installed via MSI from Win 10)
or
- via the
icon on the desktop,
or
- directly on the command line, e.g. by
C:\Program
Files (x86)\CSBG.biz\T3CPßC:\Program Files
(x86)\CSBG.biz\T3CP3cp.exe
Main menu
If T3CP is registered, the main menu will appear
directly at the start of the program.
From here you can start to get to know the
"Wizard": this will lead you through the necessary steps to extract
SAP table content on a local database.
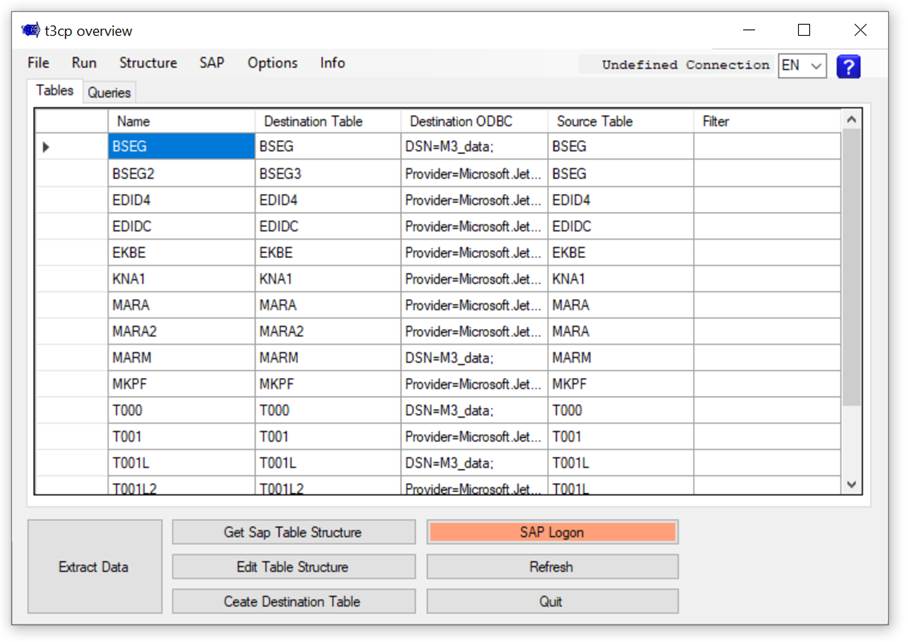
The main window is the starting point to set up and
edit links for SAP tables and SAP queries.
For this purpose, select a row and klick on "Edit the table structure".
Alternatively, do a right-click on the corresponding line.
Options
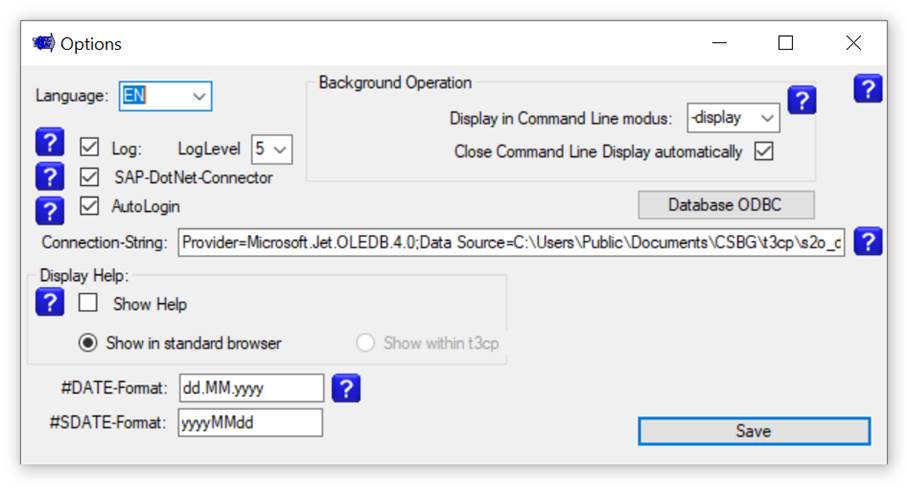
In the Options window, you can set the following
values:
-
the program language: "Language"
or "Sprache”.
German and English are supported.
-
Activate the "SAP-DotNet-Connector" function: this enables the
corresponding interface connector of the SAP. The required DLL can be obtained
from SAP, see: https://support.sap.com/en/product/connectors/msnet.html .
Required for newer SAP GUI versions (from 750).
-
“Log”: activate or deactivate
the log option: The log table is then filled with events. Using the log level,
you can set whether everything (level 5) or only errors should be logged (level
1).
-
"AutoLogin"
option: t3cp logs into the SAP systems automatically even in interactive
operation (without required password entry).
-
"Connection String":
this ADODB link points to the database with the control tables of T3CP
application (does not necessarily have to be equal to any database with the
user data, these are defined individually in each link)
With “Database ODBC”, you can easily create the string to your local
s2o_data.mdb.
A typical Connection string looks like this:
Provider=Microsoft.Jet.OLEDB.4.0;Data
Source=C:\Users\Public\Documents\CSBG\t3cp\s2o_data.mdb;Persist Security
Info=False
-
the DATE format for the
placeholders #DATE and #SDATE in the filter conditions
-
Background Operation can be used to specify background processing details:
- a window should be displayed in batch mode.
"-display" evaluates a
call parameter to be passed.
-
Close Command Line
-
“Show Help” display: "Show
Help" also activates the blue „?“ in the
windows.
-
With F1 or by clicking on the blue icon, depending on the window, details „?“ also appear
for details with a jump to the appropriate location in the help text.
Wizard
Let the Wizard guide you to create a table data
transfer: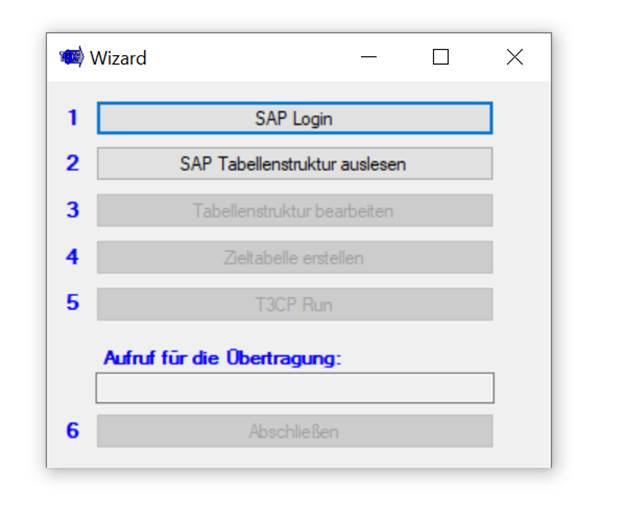
1.
The first step is to log on to the SAP ERP system. The login data can be
saved. Only one connection can be saved per table or query. For more details,
see the Login section.
2.
Transferring the structure describing the table itself, see creating a new
link
3.
Editing the table structure - here the field assignment and the filter
conditions are defined, see Edit link
4.
Create the target table (destination): if the table has not yet been
created in the target database, you can now create it (corresponding to the
requirements from the field mapping).
5.
Start the data transfer
6.
Quit the "Wizard" with Done
Control the data content in T3CP (table structure / SQL options / table
content). Or check in a database tool the content of the table (e.g. Access).
Login
In the menu under SAP /
Login you can log in to an SAP system. The following describes the procedure
with the "SAP-DotNet-Connector" option
enabled under Tools. 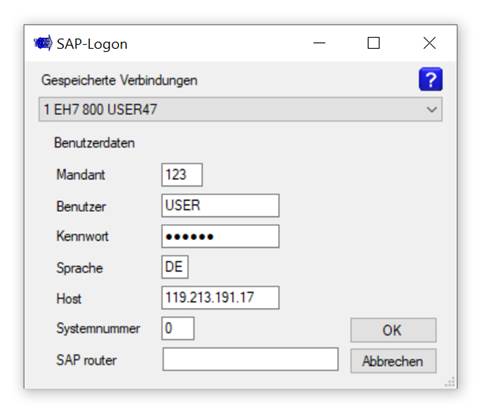
Note:
If the DotNet connector is not activated, this window
looks different.
Enter the data for the
SAP ERP server, client, user, password as well as host and system number, the
SAP router string is optional.
The connection data is
stored and can be retrieved with a web-recovered login.
T3CP supports access to multiple SAP systems from one T3CP instance. Therefore,
you can enter and select among multiple connections here.
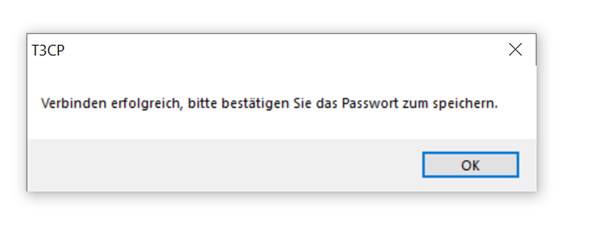
You should save the
password if you are planning to use a command line call. This allows the
connection to be re-established. To do this, click yes when the message that
appears after the first successful login with the question whether you want to
save and key in the password again. Here you also have the option to store the
password in the database encrypted to the PC.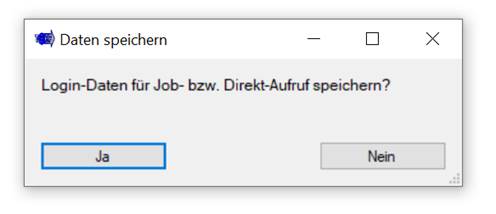
Picture: Save the
Password
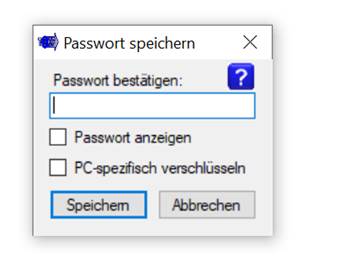
Here you can display
the password input and, if necessary, encrypt pc-specific. This means that the
password cannot be used on other systems.
You are now logged in
to the SAP system and can use the other functions of T3CP.
The password has been stored encrypted in the database. Reading access to the
SAP system is thus possible via T3CP! The database containing the configuration
tables should therefore be protected from unauthorized access.
In the menu under SAP /
Password List you can check which logins are stored. Access data for various
SAP systems can be stored here: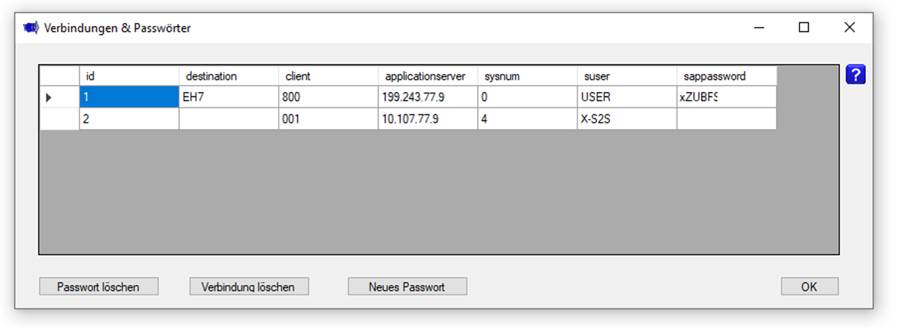
Delete password: select
a line and click on "Delete
password". The password will be deleted.
Set a new password:
select a line and click on "New
password". In the following window, you can enter the password (for
example, to use for scheduled tasks to the appropriate connection or system.)
Performing the extraction
To start data transfer,
select a line with the appropriate link or query in the main menu by clicking
the left-click line.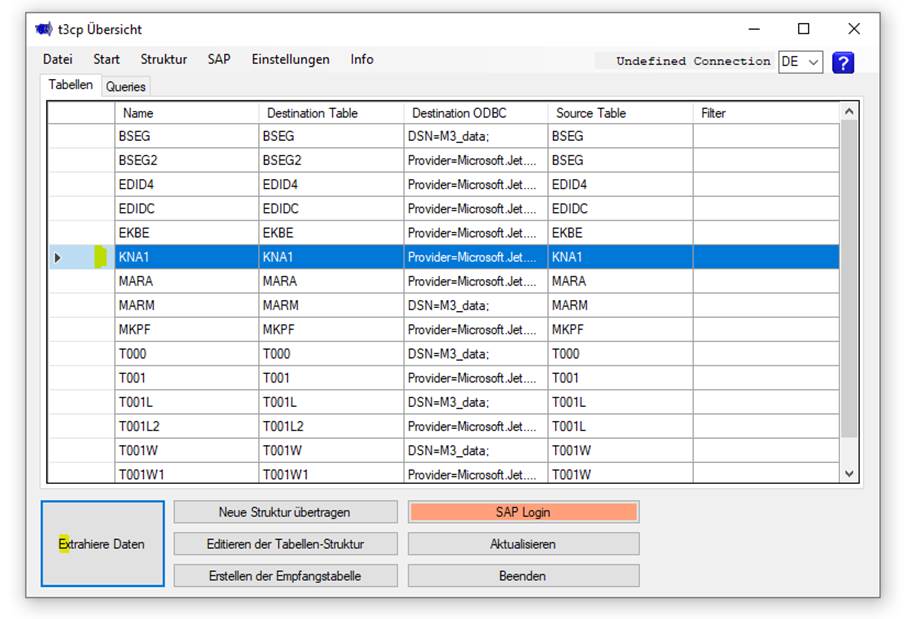
Then click on the
"Extract Data" button at
the bottom left. The transfer starts. This process may take a few minutes.
There is an option to split the transfer into packages in the details of the
link (see SAP Options).
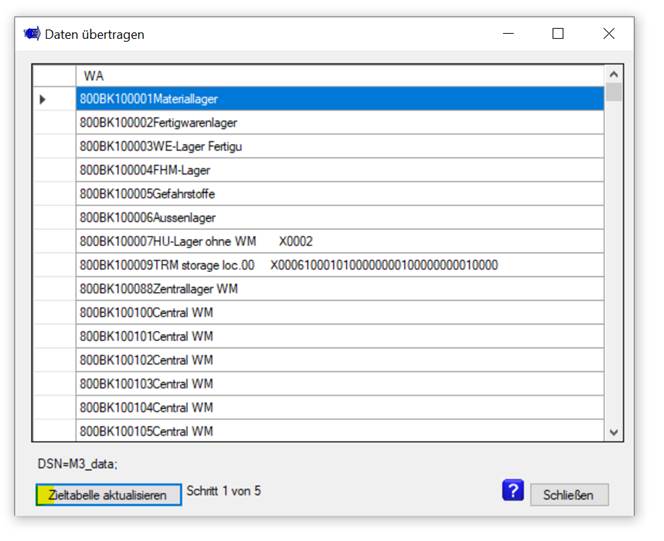
By clicking on "Update target table" the data is
transmitted to the destination table.
If necessary, the transfer is divided into packages/packages and it is then
displayed e.g. as "Step 1 of 5". In this case, you must confirm the
update 5 times. Of course, this manual confirmation is omitted for a scheduled
job (which can be run in the background by scheduled Windows task without any
interaction.)
Creation of a new
Link ("Tables")
To create a new link,
click on the "Transfer New Structure" item on the main menu.
If the
"Tables" tab is selected, the next dialog is to define a table
transfer.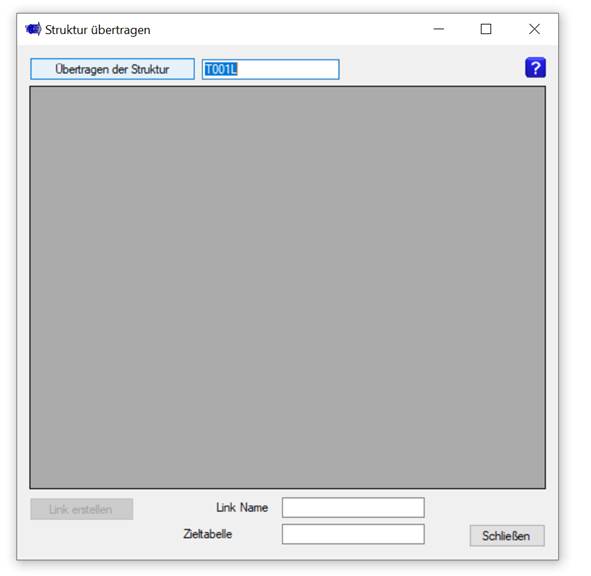
Clicking on "Transferring the structure" in the
upper left corner retrieves the structure data from the SAP system (i.e. the
list of fields in the table).
You can adjust the Link
Name and also the name of the destination table here.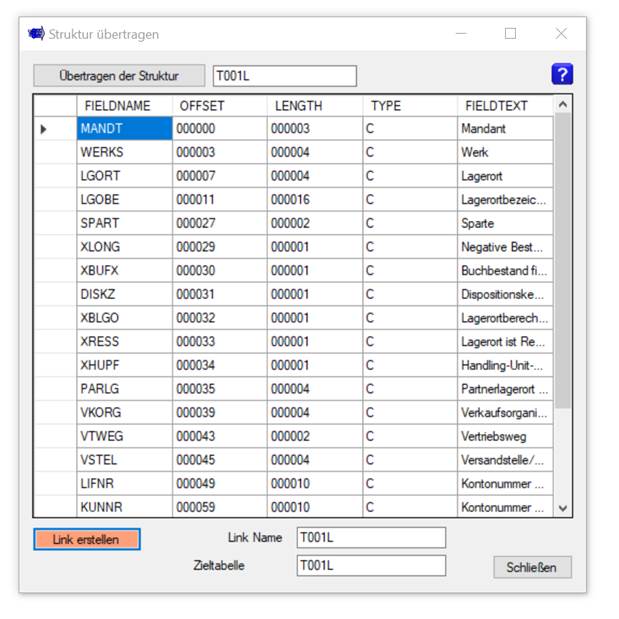
Click on "Create Link" to save the data as a
"T3CP Link". Still no table has yet been created on the target
system.
„Edit Link“
To edit an existing or
newly created link, select it from the main menu and then click the "Edit the table structure" button.
The Edit Structure window opens.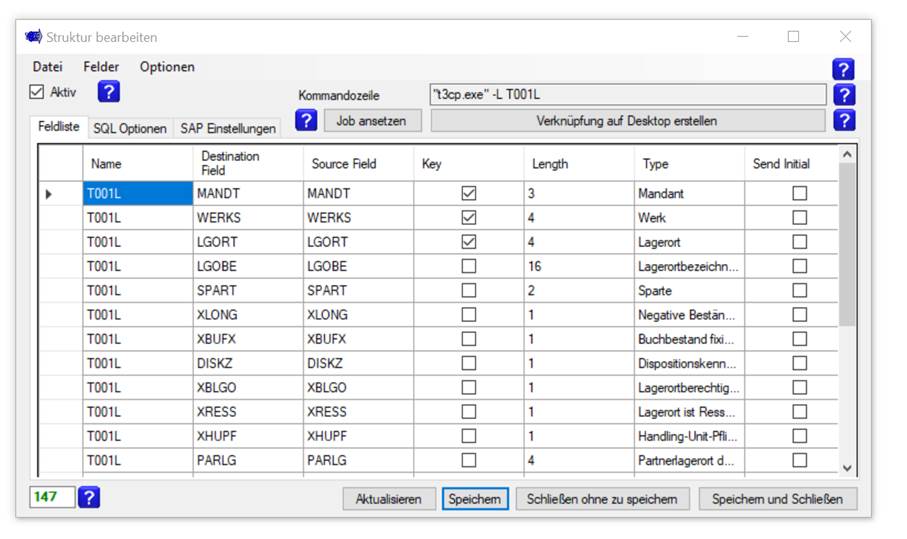
Columns
Name: Name of the SAP table
Destination Field: Name of the field in the receiving
table
Source Field: Name of the field in the SAP
table
Key: Select the key
fields here if you only want updates to be processed via update. See SQL
Options.
Length: Length according to SAP
data element
Type: Short Name from SAP
Send Initial: when
selected then "initial" values in the target database are converted
correctly. This prevents, for example, empty dates from causing the INSERT or
UPDATE to be cancelled.
Field Mapping
If the SAP standard
function module RFC_READ_TABLE is used (see "SAP Settings"), then
the number of characters per record is limited. This is displayed in the box at
the bottom left. Green means: the maximum quantity is not exceeded.
Field names can be
deleted in the Destination Field column. These fields are not transferred. T3CP
marks only as many fields as the function module can transfer.
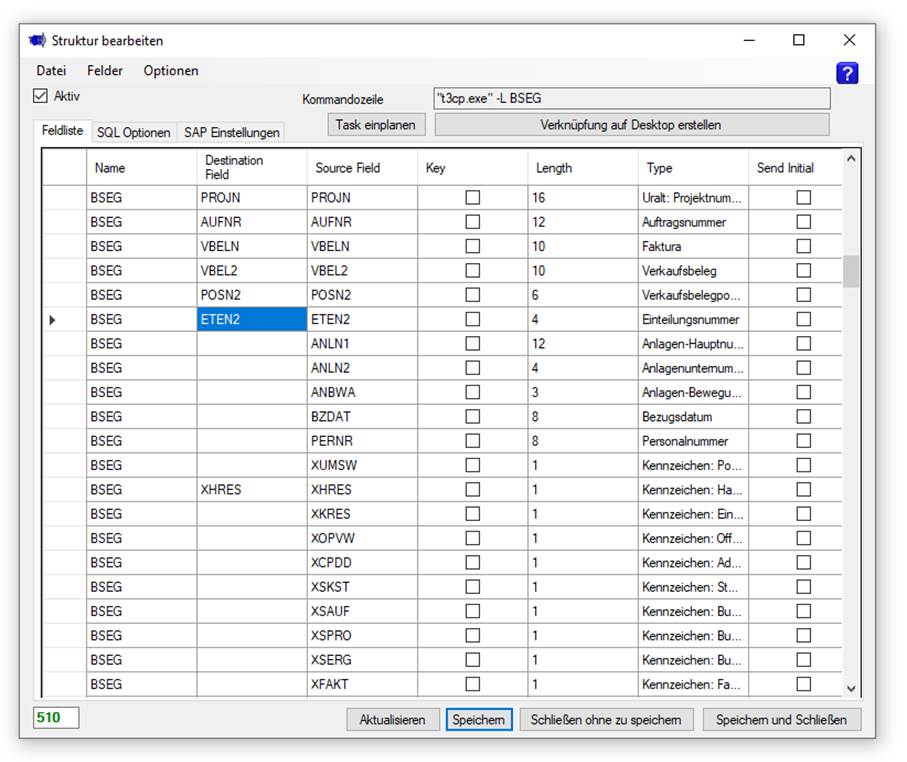
You can manually delete
additional fields, change names or enter them again (double-click the SAP name
to the empty field). Finally, make sure that the total quantity (512 characters)
is not exceeded: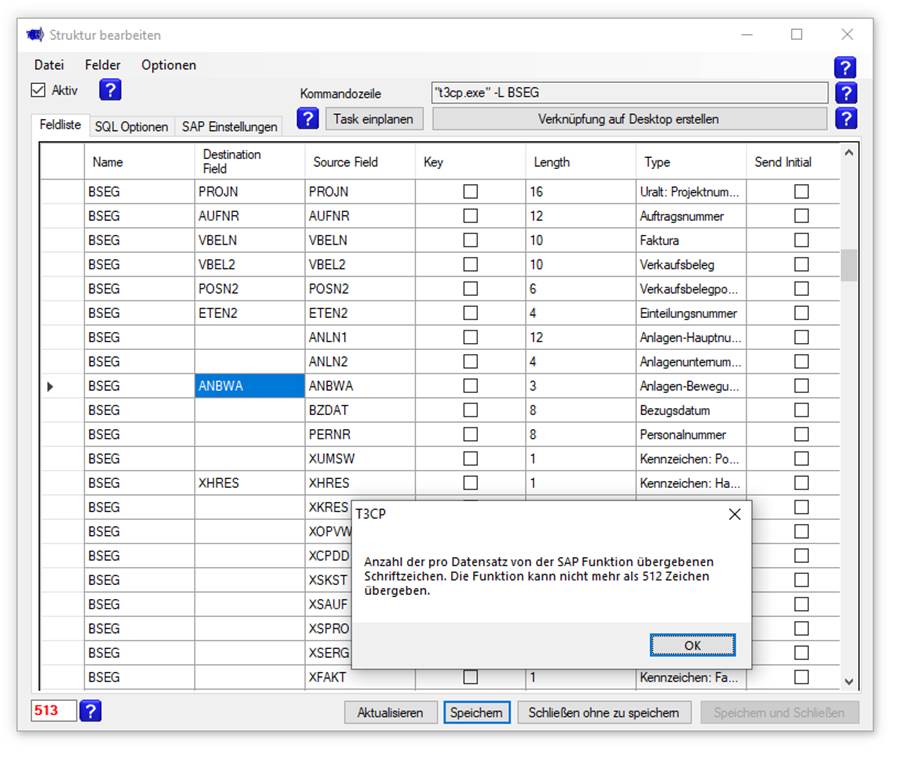
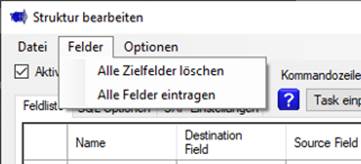
In the menu, you can
mark all fields as to be transferred (to then manually delete certain fields if
necessary) or, the other way around, mark all fields as not to be transferred
("Delete all target fields").
In this case, a double click in the empty field is sufficient
for each line to fill it again.
The field names (which
you may change) are used when the table is created in the target database.
„SQL Options“
Parameters for writing
the data can be set here.

“Active”:
if the checkbox is not selected, this table is ignored for background tasks
(and job chains), i.e. not executed.
"Command
Line": displays the call in the command line, e.g. for use in a batch
file (*.bat or *.cmd)
“Schedule Task”:
the transfer of the selected table can be scheduled directly as a Windows task.
To do this, you may need to run T3CP as an administrator. After clicking on
"Schedule Task" the
following message appears:
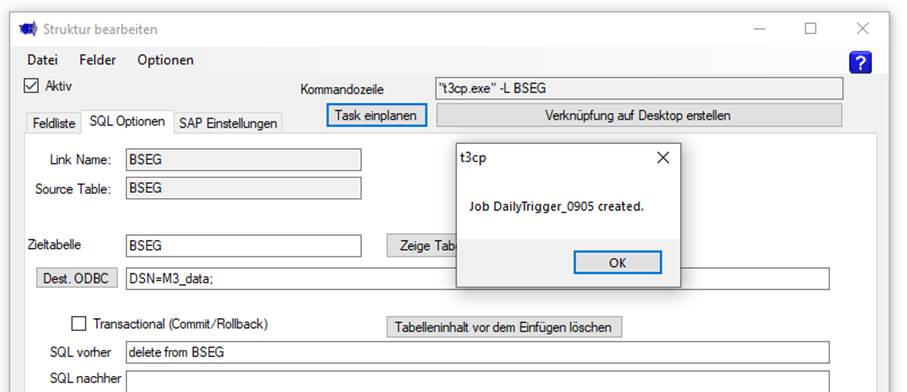
After confirmation, the
window for the other settings for the scheduled task appears:
With "Edit Task" the settings for
scheduling can be changed or adjusted, see "Schedule tasks":
You can create a
shortcut with Create A Shortcut on Desktop. By clicking on the created icon,
the data transfer is initiated directly. To do this, T3CP is called with
parameter -L and the name of the
table or link.
“Create Table”:
As long as the table does not yet exist in the target
database, it must be created. This can be done via T3CP.

Click "Create
Table" an SQL command string is created (according to the selection of
the relevant fields)
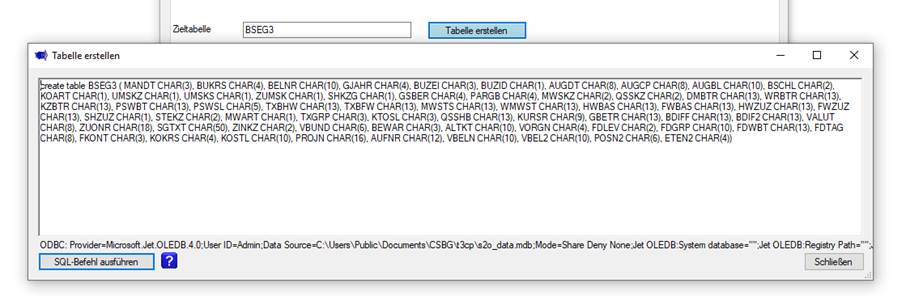 Run “Execute sql command” creates the table. This step is omitted if
you create the table manually or the table already exists. After successful
installation, a corresponding message appears.
Run “Execute sql command” creates the table. This step is omitted if
you create the table manually or the table already exists. After successful
installation, a corresponding message appears.
“Show Table Content”: When the table is created in the target database,
the content can be displayed.

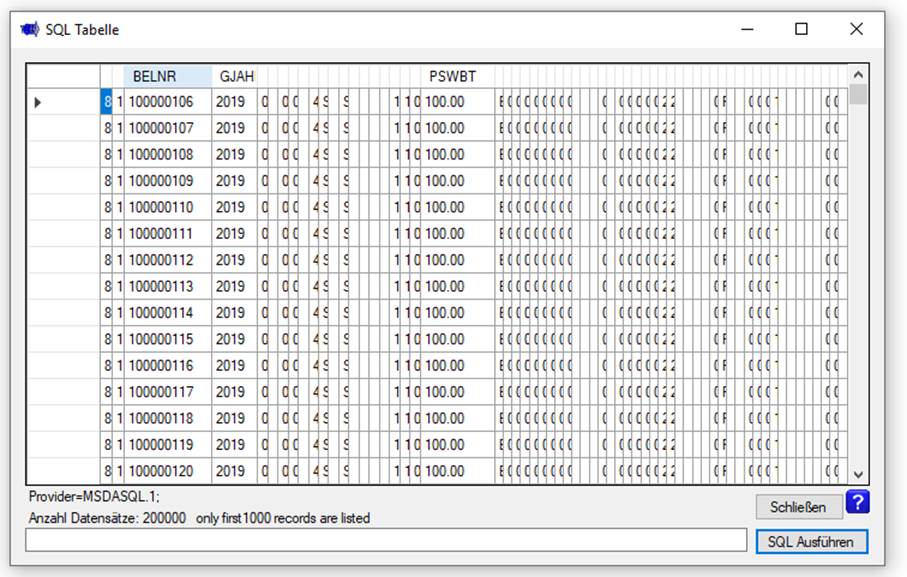
Only 1000 sets are
listed for performance reasons. The lower part shows the connection string to
the table (provider) and the number of records.
You can manually enter
another select command with, for example, where conditions in the SQL field (at
the bottom) and use “Execute SQL” to
display the result.
"Dest. ODBC"
Store the link to an
ODBC database here. This allows different receivers to be set.
The control tables can
be stored on the s2o_data.mdb in MS Access format, but the table data could be
stored in an MS SQL or Oracle database.
(There is also the
option to store the control tables on an MS SQL database, see Notes)
![]()
By clicking on "Dest. ODBC" (Destiniation
/ Target ODBC) you can generate a suitable connection string:
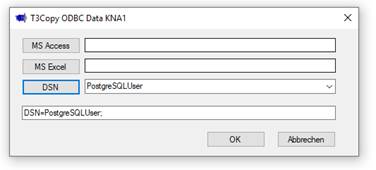
Under DSN, for example,
you can use set ODBC connections (32 bits).

If you run into
problems regarding the Driver Provider=Microsoft.ACE.OLEDB.12.0:
Download the Microsoft Access Database Engine 2010 Redistributable
and execute AccessDatabaseEngine.exe to install the missing driver
https://www.microsoft.com/en-gb/download/details.aspx?id=13255

„Transactional (Commit / Rollback )“
![]()
The transfer is committed to the transaction if the database system can
process a commit.
If multiple packages are combined into one commit.
„SQL before“
Executes the specified
SQL string before the INSERTs or UPDATEs are processed.
„SQL after“
Executes the specified
SQL string after all INSERTs and UPDATEs have been processed.
Click Delete Table Content
Before Inserting to enter an SQL command to empty the table in "SQL before".
If you set "Insert or Update..." (see below),
the table should not be emptied.
![]()
Select this option to search T3CP in the table for a
record with the same key (see field, column "Key"). If an existing
record is found, the non-key fields are updated with UPDATE.
„Update Modus“
You can choose between
three options:
"Default": an
index is not used
"Create and use
indices": If there is no yet a new one, a new one is created.
"Use only existing
indices": an existing user is used if available, no new one is created.
“SAP Options”
Set SAP related
configuration here.
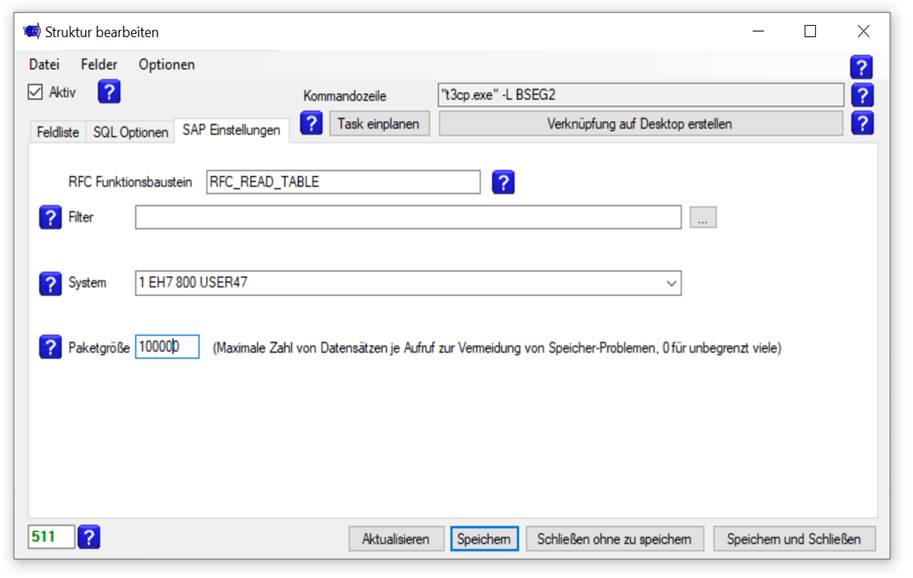
By default,
"RFC_READ_TABLE" is entered here. You can also use another function
module (e.g. without limitation to 512 bytes) and enter it here.
See Hint.
![]()
The filter can be
entered directly or with the symbol "..." can be assembled. The syntax
is specified by the function block "RFC_READ_TABLE" for the table
OPTIONS.
![]()
An SAP system is
assigned for each table. This means that data can be transferred from different
SAP systems.
![]()
The package size
indicates how many records to transfer in an RFC call (zero is ignored).
Multiple 100,000 records can cause memory problems, depending on the system.
If, for example, 100,000 is taken as the package size, a total of 6 packets are
transferred for a total of 560,000 data sets. This also allows large amounts of
mass data to be transferred without memory overflow.
![]()
Note: In theory,
records can be removed or added between package calls, for which either another
set will be duplicated in the total overtime or another set will be missing.
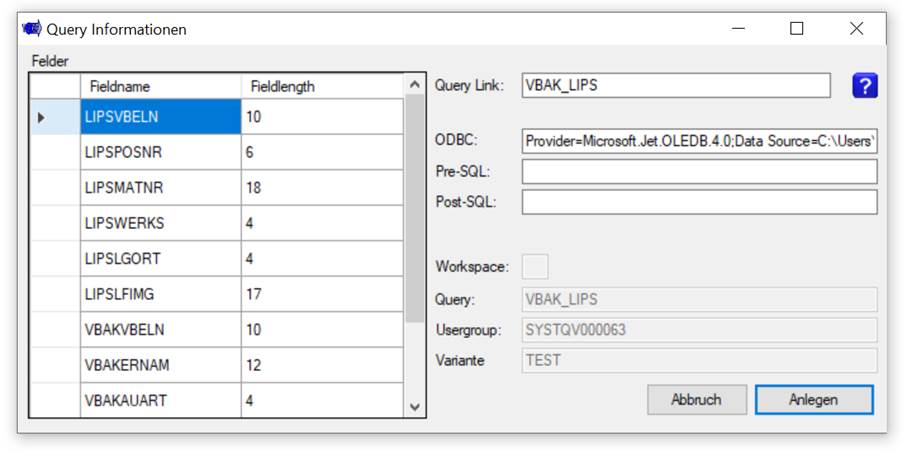
Create a new Query
Link („Queries“)
For example, SAP QuickViews
can be created quickly using transaction. If you save variants for this, you
can call them directly through T3CP.
To create a new link to a query, first select the
order "Queries" and
on the main menu click on the item "Transfer
query structure":
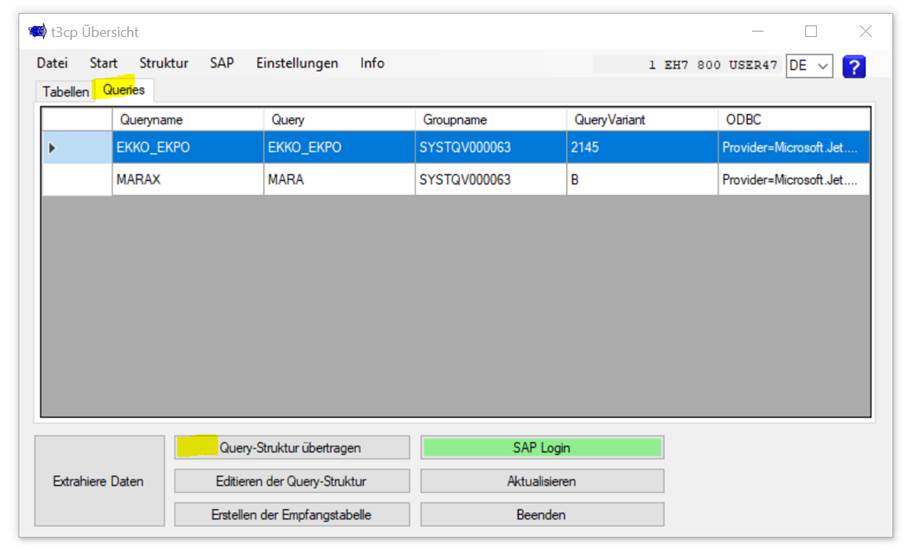
T3CP pulls out the existing
queries / quick views from the SAP system and in the next step you can choose:
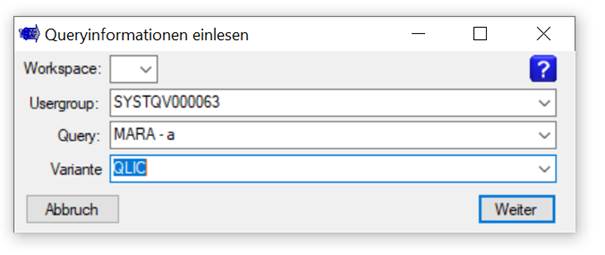
Workspace - here you can select Global or Standard.
Usergroup
Query: You
can select a Quickview or a query
Variant: To
extract data by query, a variant must be specified. If there is no variant to
the query yet, you can create one now. If necessary, also without any selection
restrictions.
In the next window, you can customize the link name. The
other data can also be adjusted later. There is
no length limit.
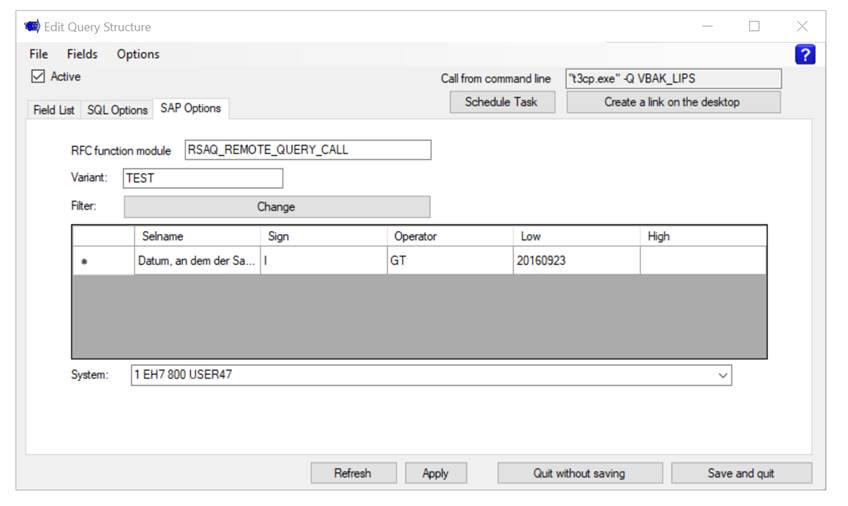
„Edit
Query Structure“

„Active“: if the
checkbox is not selected, this table is ignored for background tasks (and job
chains), i.e. not executed.
Schedule a Windows task for query extraction. See
Scheduling for Table Transfer.
You can create a shortcut
with Create A Shortcut on Desktop. By clicking on the created icon, the data
transfer is initiated directly. For this purpose, T3CP is called with parameter
-Q and the name of the query / Quick Views or the link.
„Call from
command line“:
displays the call in the command line, e.g. for use in a batch file (*.bat or
*.cmd)
Columns
Name: Name
of the SAP table
Destination Field: Name
of the field in the receiving table
Source Field: Name
of the field in the SAP table
Key: Select
the key fields here if you only want updates to be processed via update. See
SQL Options.
Length: Length
according to SAP data element
Send Initial: if
selected, then "initial" values in the target database are correctly
converted. This prevents, for example, empty dates from causing the INSERT or
UPDATE to be cancelled.
„SQL Options“
„Create table“: As
long as the table does not yet exist in the target database, it must be
created. This can be done via T3CP. (See Link for Tables).
„Show Content“: when the table is created in the target database the content
can be displayed. (See Link
for Tables).
„Dest. ODBC“
Define here the link to
an ODBC database. This allows different receivers to be set. (See Link for
Tables).
„Transactional (Commit / Rollback )“
![]()
The transfer is committed to
the transaction if the database system can process a commit.
Executes the specified SQL string before the INSERTs or UPDATEs are
processed.
„SQL after“
Executes the specified SQL string after all INSERTs and UPDATEs have been
processed.
“delete table
content bfore insert”
Click Delete Table Content Before Inserting to enter an SQL command to
empty the table in "SQL Before".
If you "Insert or Update..." (see below), the table should not be
emptied.
„Decide whether to insert or update,
regarding table with key fields“
![]()
Select this option to let T3CP search in the table for existing record with
the same key (see field, column "Key"). If an existing record is found,
the non-key fields are updated by SQL UPDATE (instead of INSERT).
„SAP Options“
By default, "RSAQ_REMOTE_QUERY_CALL" is entered here. You can
also refer to your own function module.
To transfer data to a query,
at least one variant must have been defined and used.
You can use the "Change"
switch to set additional filters in addition to the selection criteria of the
variant:
A window appears with the filter details:
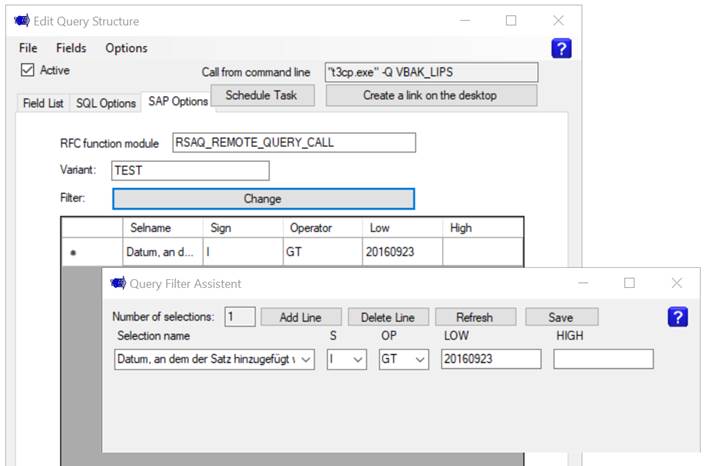
Selections name: Name of the variable incl. technical
name
"S" Indication
whether the values are included or excluded (inclusive, exclusive)
The
contents of SIGN determine for each row whether the result of the row condition
is to be included in or excluded from the resulting set of all rows.
“I”
stands for "inclusive" (inclusion criterion - operators are not
inverted)
“E”
stands for "exclusive" (exclusion criterion - operators are inverted)
"OP" operator,
equivalent to SAP, contains the selection operator. The following operators are
available:
If
“HIGH” is empty, you can use :
EQ
= equal
NE
= not equal
GT
= greater than
LE
= less or equal
LT
= less than
CP
= contains pattern
NP
= not contains pattern
Hint
from SAP: Yet operators CP and NP do not have the full functional scope they
have in normal logical expressions.
They
are only allowed if wildcards ( '*' or '+' ) are used
in the input fields. If wildcards are entered on the selection screen, the
system automatically uses the operator CP.
The
escape character is defined as #.
"LOW" Low
value
"HIGH" High value
(optional)
These fields are appropriately
used in the definition of variants, including queries and quickviews.
An SAP system is assigned for each table. This means that data can be
transferred from different SAP systems.
Definition of Job Chains
The definition of job chains
can be called via the menu "Start" / "Job Chains".
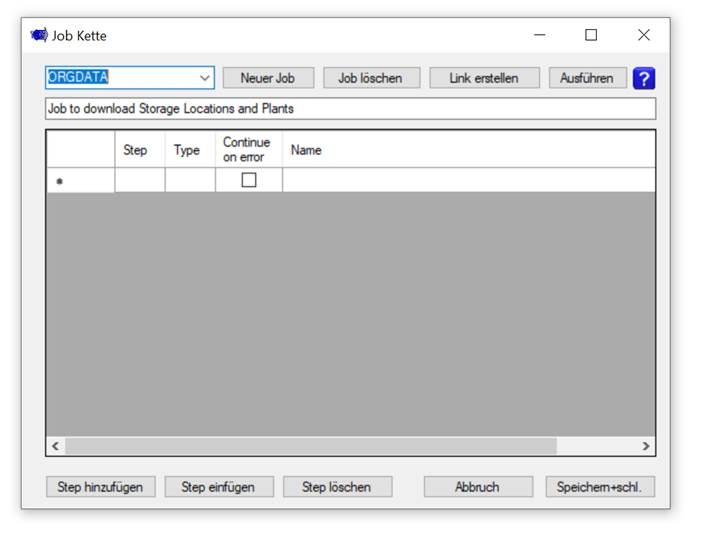
Add Step
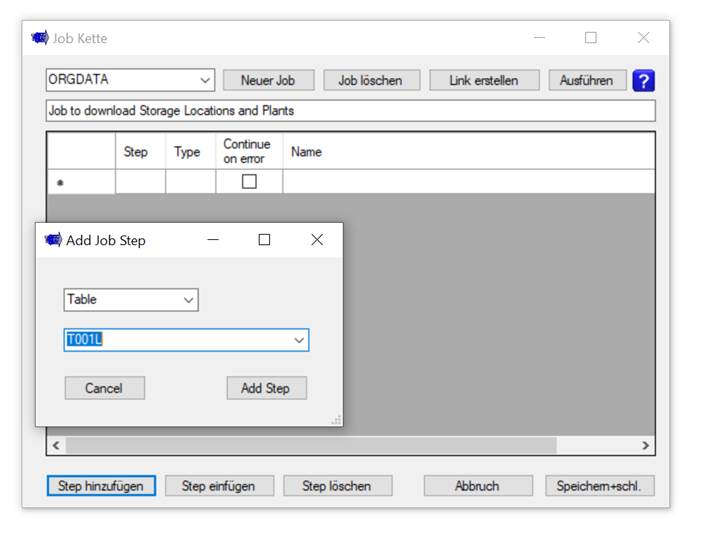
Three types can be
added:
"Table": a link to the transfer of an SAP
table is executed.
"Query": a defined SAP query is executed
"Command": the command is executed at the command line
level.
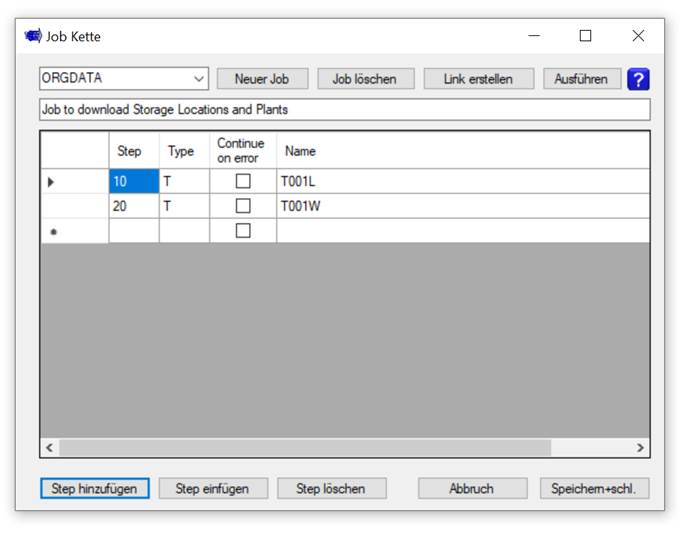
„Continue on error“:
Step 20 is also
performed for transmission errors in step 10.
„Safe and close“: the job chain is saved and the window
is closed.
„Create Link“:
creates a link to the created
job chain for direct call.
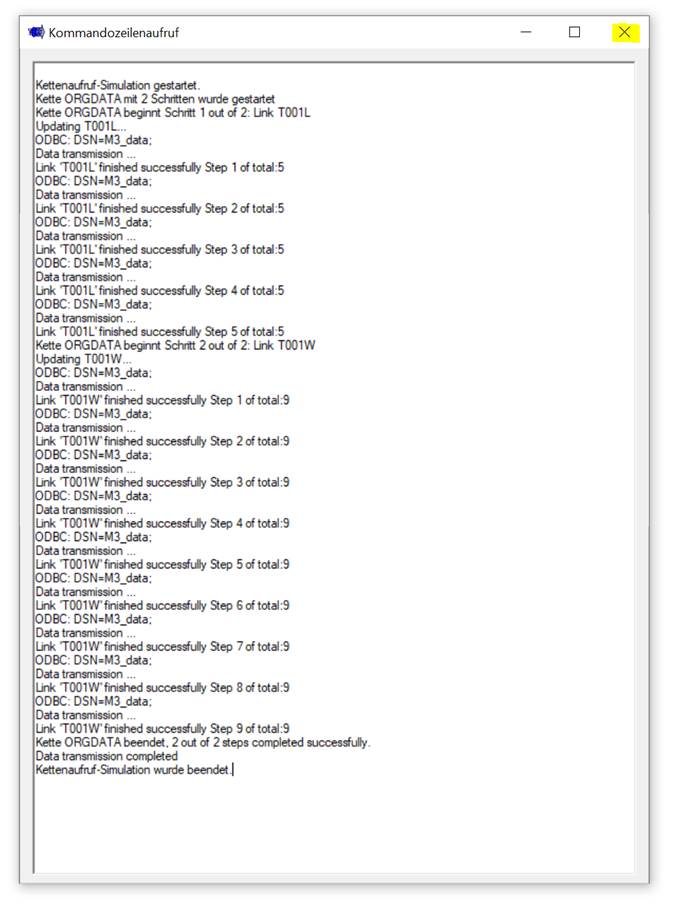
„Execute“: The steps of the job chain are performed
immediately (and the logging is displayed in a window). This call is useful for
testing the job chain. In the figure, for example, two table downloads in
several "packages" were successfully executed.
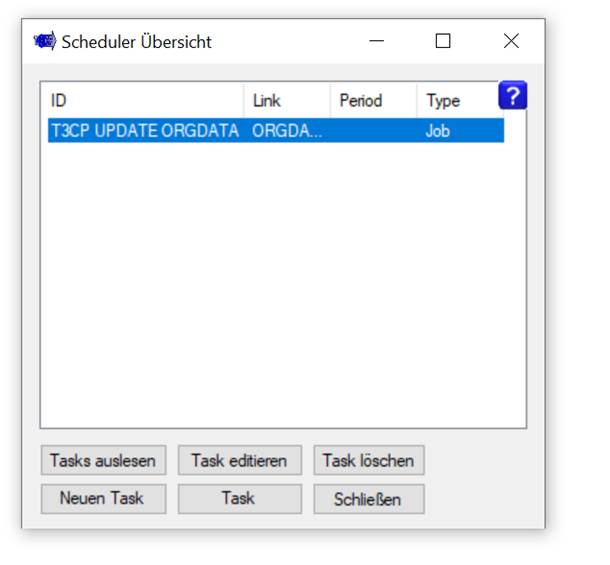
Scheduler
The scheduler can be
accessed via the Start / Scheduler menu.
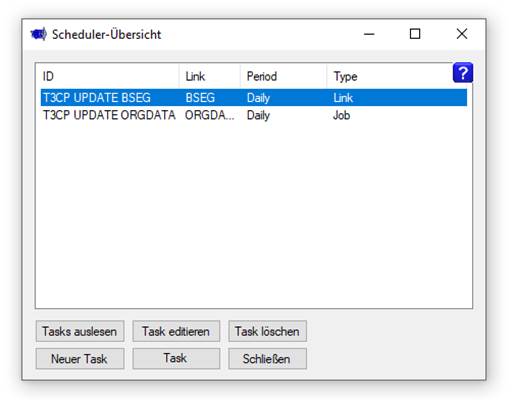
First, the overview of
the tasks (scheduled tasks) appears:
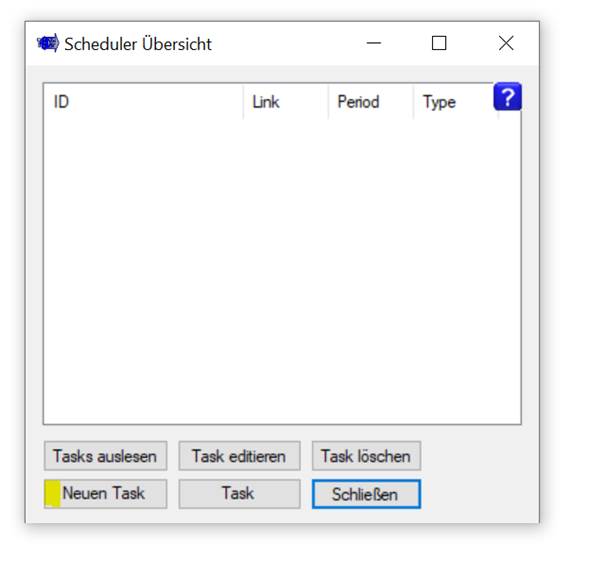
Select „Create new“
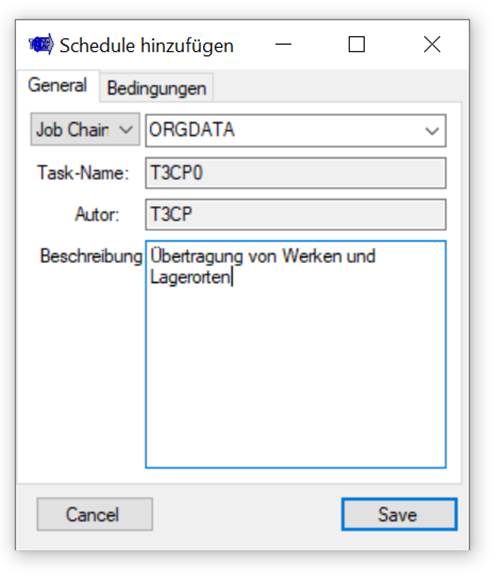
For a scheduled task
you can choose from three types:
-
Table
Link
-
Query
-
A job
chain "Job Chain"
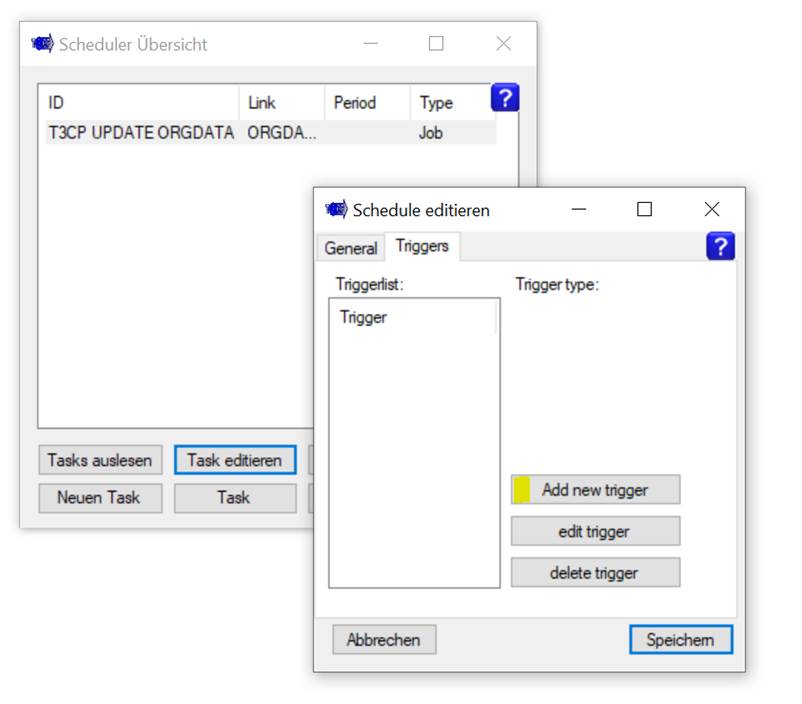
With "Task
Edit" you can define a trigger for a task:
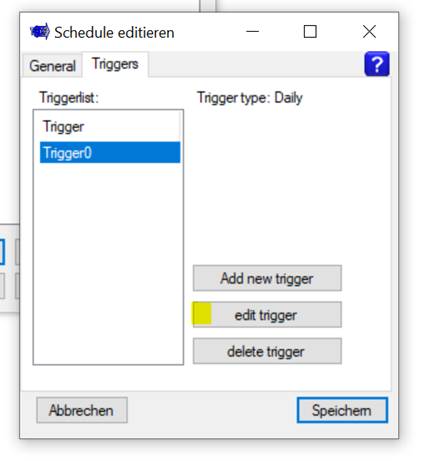
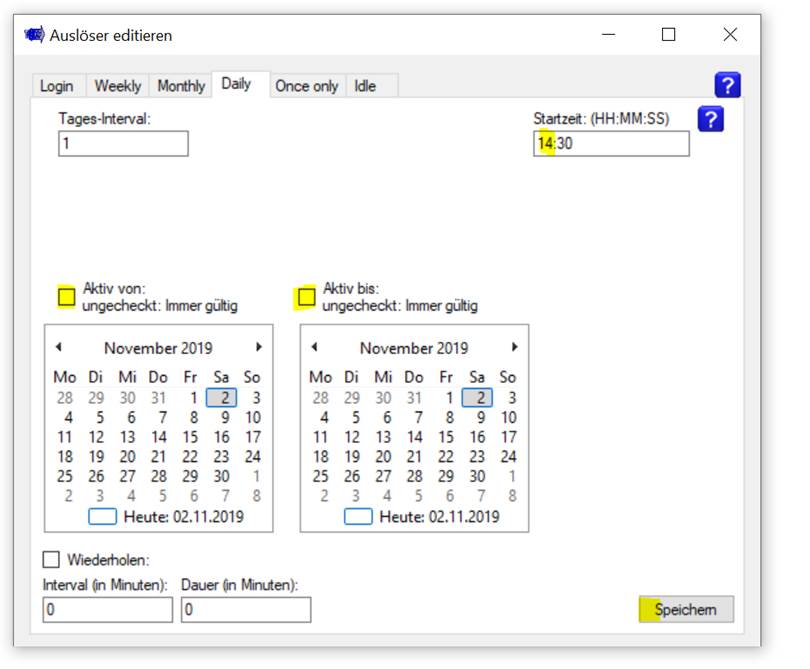
This task will now run
daily at 14:30.
“Save” backs up the data and schedules a task on the computer.
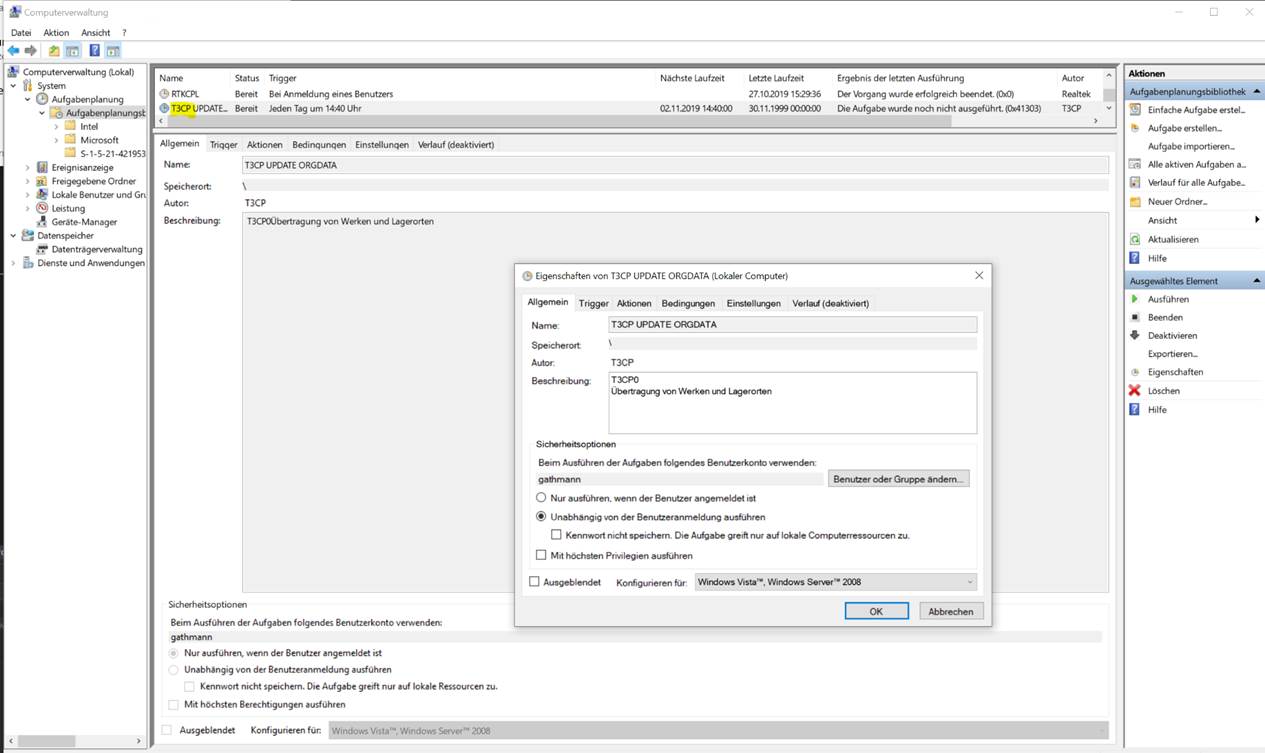
In local computer
management, this task is visible and can be further customized, modified, or
deleted:
Hints
![]()